
Saturday, July 14, 2012
Customize Apache's SOLR UI using VelocityResponseWriter - Step by Step Tutorial!

Recently, I was working on a project where I had to develop a UI for SOLR search engine. I was proposed to use either VelocityRespondWriter or XSLT. Well, I was new to it, and let you know that before starting on this project, I had never heard about SOLR. As per my habbit, I never say 'NO', so, as usual, I made a deal and started on it. I kept researching, exploring references blah blah. Finally, with very first success, I got to know, yeah! VelocityRespondWriter would be easier, compared to XSLT. reason is HTML/CSS programming, in which I do most of my project works and I'm expertise in. Well, very first step was completed.
Now, it was time to sit and get to know what exactly this VelocityRespondWriter is? Even now, I don't know much about it in deep, but one thing is got to know is how to work with it to customize your UI. So, let's begin to this very simple but awesome tour of SOLR's UI customization ;)
Step 1: Well, get ready with everything setup. I assume that you know basics of Apache SOLR (Apache Lucene). You must have it installed on you computer.
Step 2: Launch your SOLR Search Engine by going to command prompt. Move to C:\solr\examples in your command terminal and execute this command:
java -jar start.jar
Step 3: Well, you must see something like this:
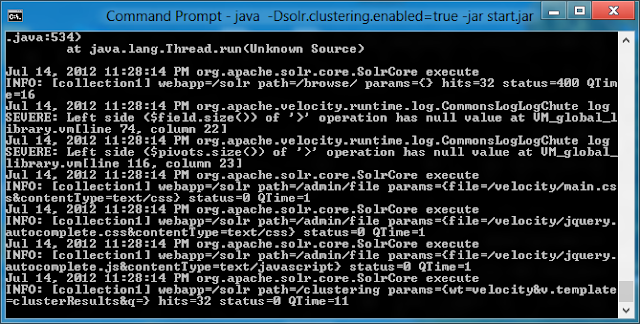
Step 4: If you can see exact screen as shown above in your computer, your first job is done! To open SORL Search page. navigate to following URL in your favorite web browser:
http://localhost:8983/solr/collection1/browse/?
Step 5: Now, it's time to work with VelocityRespongWriter to edit your UI. The default UI which SOLR provides is something like shown below:

Step 6: Cool, so, its time to customize this boring user interface and get one of your choice. So, let you know what all you need to do.
Step 7: Go to the following path:
C:\solr\example\solr\conf\velocity
Step 8: In the velocity directory, you will see number of files with the extension ".vm" along with few CSS (Stylesheet) files.
Step 9: Open header.vm file in your favorite text editor. I recommend you to use notepad++. It has text something like this:

Step 10: if you want to change the default SOLR logo, simply edit the <img src....> code, and refresh your Search page in browser. Viola!!! ;)
Step 11: Similarly, open all other .VM files one by one and play with HTML code with CSS tricks. You will see your own customized UI in a very little time. Well, I would like to show you just a part of UI I had customized, especially, header part:

Step 12: To use images on your .VM files, you must store them under following directory:
C:\solr\example\work\jetty-0.0.0.0-8983-solr.war-_solr-any-\webapp\img
Well, its all for now, I will continue working on this powerful search engine and hope to see you again on the same spot with another new interesting piece of information. Goodbye for now!

Subscribe to:
Post Comments (Atom)


0 Responses to “Customize Apache's SOLR UI using VelocityResponseWriter - Step by Step Tutorial!”
Post a Comment