
Recent Articles
Showing posts with label Web Designing. Show all posts
Showing posts with label Web Designing. Show all posts
Saturday, July 14, 2012
Saturday, July 14, 2012
- 0 Comments

Recently, I was working on a project where I had to develop a UI for SOLR search engine. I was proposed to use either VelocityRespondWriter or XSLT. Well, I was new to it, and let you know that before starting on this project, I had never heard about SOLR. As per my habbit, I never say 'NO', so, as usual, I made a deal and started on it. I kept researching, exploring references blah blah. Finally, with very first success, I got to know, yeah! VelocityRespondWriter would be easier, compared to XSLT. reason is HTML/CSS programming, in which I do most of my project works and I'm expertise in. Well, very first step was completed.
Now, it was time to sit and get to know what exactly this VelocityRespondWriter is? Even now, I don't know much about it in deep, but one thing is got to know is how to work with it to customize your UI. So, let's begin to this very simple but awesome tour of SOLR's UI customization ;)
Step 1: Well, get ready with everything setup. I assume that you know basics of Apache SOLR (Apache Lucene). You must have it installed on you computer.
Step 2: Launch your SOLR Search Engine by going to command prompt. Move to C:\solr\examples in your command terminal and execute this command:
java -jar start.jar
Step 3: Well, you must see something like this:
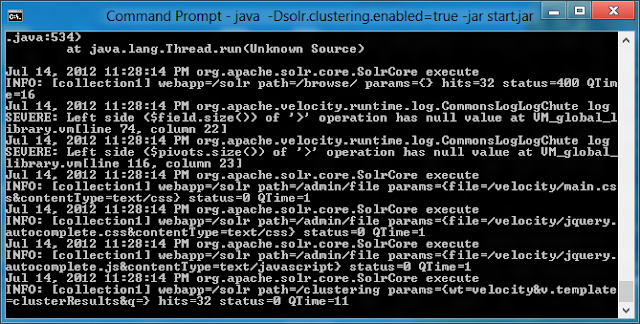
Step 4: If you can see exact screen as shown above in your computer, your first job is done! To open SORL Search page. navigate to following URL in your favorite web browser:
http://localhost:8983/solr/collection1/browse/?
Step 5: Now, it's time to work with VelocityRespongWriter to edit your UI. The default UI which SOLR provides is something like shown below:
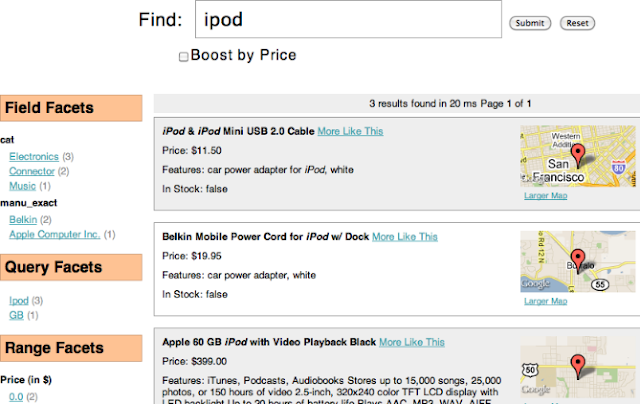
Step 6: Cool, so, its time to customize this boring user interface and get one of your choice. So, let you know what all you need to do.
Step 7: Go to the following path:
C:\solr\example\solr\conf\velocity
Step 8: In the velocity directory, you will see number of files with the extension ".vm" along with few CSS (Stylesheet) files.
Step 9: Open header.vm file in your favorite text editor. I recommend you to use notepad++. It has text something like this:

Step 10: if you want to change the default SOLR logo, simply edit the <img src....> code, and refresh your Search page in browser. Viola!!! ;)
Step 11: Similarly, open all other .VM files one by one and play with HTML code with CSS tricks. You will see your own customized UI in a very little time. Well, I would like to show you just a part of UI I had customized, especially, header part:

Step 12: To use images on your .VM files, you must store them under following directory:
C:\solr\example\work\jetty-0.0.0.0-8983-solr.war-_solr-any-\webapp\img
Well, its all for now, I will continue working on this powerful search engine and hope to see you again on the same spot with another new interesting piece of information. Goodbye for now!
Tuesday, July 10, 2012
Tuesday, July 10, 2012
- 0 Comments

Without going into much description, let us check out the differences between HTML4 and HTML5 in following tabular manner.
| HTML4 | HTML5 |
| DOCTYPE is much longer as HTML4 is based on SGML-based. <!DOCTYPE HTML PUBLIC "-//W3C//DTD HTML 4.01//EN" "http://www.w3.org/TR/html4/strict.dtd"> | DOCTYPE is required to enable standards mode for HTML documents. <!DOCTYPE html> |
| Audio and Video are not the part | Audio and Videos are integral part of HTML5 specifications e.g. <audio> and <video> tags |
| It is almost impossible to get true GeoLocation of user browsing any website especially if it comes to mobile devices. | JS GeoLocation API in HTML5 helps identify location of user browsing any website |
| Browser cache can be used as temporary storage. | Application Cache, Web SQL database and Web storage is available as client side storage. Accessible using JavaScript interface in HTML5 compliant browsers. |
| Works with all old browsers | Most of modern browser have started supporting HTML5 specification e.g. Firefox, Mozilla, Opera, Chrome, Safari etc. |
| Does not allow JavaScript to run in browser. JS runs in same thread as browser interface. | Allows JavaScript to run in background. This is possible due to JS Web worker API in HTML5 |
| Web Sockets are not available. Generally used mechanisms are long polling and streaming. | Full duplex communication channels can be established with Server using Web Sockets. Accessible using JavaScript interface in HTML5 compliant browsers. |
| Vector Graphics is possible with the help of technologies such as VML, Silverlight, Flash etc. | Vector graphics is integral part of HTML5 e.g. SVG and canvas |
Although, I'm very new to HTML5, just like a newbie. If you find anything wrong in above differences, do correct me there.
Thank You!
Sunday, May 20, 2012
Sunday, May 20, 2012
- 0 Comments
Recently, I got a project to work on a Buddhist website where I had to prepare a website template with content for one of the students. I searched over internet if there is any free template available for this, but I got no solution. I kept on searching and finally, came up with one decent design but it was designed for christian religion. So what I did is, downloaded the template and modified it in order to give it a look of Buddhist website.

I have also integrated login script in it which does not make use of any database like MySQL. You can download this template for free and use or distribute it for any purpose. Hope you like it.
Thank You!
Great! Below is main screenshot:

I have also integrated login script in it which does not make use of any database like MySQL. You can download this template for free and use or distribute it for any purpose. Hope you like it.
Thank You!

CoolHandle started as a group of IT professionals in early 2001 to introduce a new standard in the fast changing environment of web hosting.
With quality service, CoolHandle also provide coupon codes to save your money of web hosting packages.
Many of their promo codes can be found on domainpromocodes.com as well. This website lists around 500 domains and hosting company coupons.
Save 20% OFF on vps hosting
..............
Save 30% off shared hosting plans
................
promo codes are valid on publish dates.
You can also try out following coupon codes fro your billing:
Coolhandle Coupons
Coolhandle Coupon Codes
Coolhandle Promo Codes
Wednesday, May 9, 2012
Wednesday, May 9, 2012
- 0 Comments

Guess who's back? Well its me! B-)
After being silent for many days, finaly I got time to write for my blog. Had a busy time before where I worked on few websites for my clients. Anyways, today I am here with a small PHP function which do wonders. If you are looking something for reading, writing files in a particular directory, then you may need this function to include. I guess, you must!
Well, this php function is called "GLOB" & is used with parethesis something like "glob()". It accept parameter as path to the files. You can use wildcard for file names such as *.jpg or *.php to read only JPG or PHP files respectively.
Use PHP glob() function to read all files in a directory with particular extension:
Step 1: This is about implemenetation of Glob() function. So, you can create any PHP file let say "index.php" under a particular directory where you have other PHP files as well.
Step 2: Open index.php and declare a variable $directory and assign name of current file to it using $PHP_SELF.
$directory = $PHP_SELF;
Step 3: Thats it! Now implemenet glob() function which will save names of all files with given extension in a particular array. Let use $image to save names.
$images = glob($directory . "*.php");
Step 4: Above code will fetch the names of all files in that directory and save it in $image. Now all you need to do is to use foreach loop to extract the file names and print them.
The whole code looks something like this:
<?php

//path to directory to scan
$directory = $PHP_SELF;

//get all image files with a .jpg extension.
$images = glob($directory . "*.php");

//print each file name
foreach($images as $image)
{
echo $image;
}
?>
Thank You!
Saturday, April 28, 2012
Saturday, April 28, 2012
- 0 Comments

In this article, I would let you know about one PHP class which you can use in your PHP script to detect various mobile platforms for your dynamic website. You can use this mobile detection script to configure your websites for most of major mobile platforms such as Android, iOS and tablets. Script is very easy t use and implement in few steps which are something like given below:
Steps to use PHP class for mobile detection:
Step 1: Download light weight PHP class from here.
Step 2: The name of file .PHP file would be something like "Mobile_Detect.php". Save this file in your webserver under root directory where other php pages of your website are located.
Step 3: Now, open index.php page i.e., home page of your website in a notepad or any other text editor like notepad++.
Step 4: To include the PHP detect class write following set of code on the top of your index.php file.
<?php
include('Mobile_Detect.php');
$detect = new Mobile_Detect();
?>
Step 5: Now right below this code, write down the following set of statements which are used to detect respective mobile platforms. You can write the appropriate code in the respective if blocks to make the look of website appropriate for that particular platform.
<?php
if($detect->iOS()){
    // code to run for the Apple iOS platform.
}
if($detect->isAndroidOS()){
    // code to run for the Google Android platform.
}

/* Other case insensitive available methods are isIphone(), isIpad(), isBlackBerry(), isKindle(), isOpera(), etc */

/* Alternatively, if you are only interested in checking to see if the user is using a mobile device, without caring for specific platform: */

if ($detect->isMobile()) {
    // any mobile platform
}
if($detect->isTablet()){
    // any tablet
}
?>
That's it. To know more platforms supported by this script, please refer the demo.php file in the zip folder.
Tuesday, April 24, 2012
Tuesday, April 24, 2012
- 1 Comment

With modern web development scenarios, page reloads are out of fashion. Programmers are coding web pages in such a way that page takes very little effort to do the same job effectively. To this, ajax and JavaScript have contributed their best. In this tutorial, we will study how we can create a simple registration page which will accept values from user like username etc, and save them to mySQL database without reloading the web page.
These are the steps we need to follow:
Step 1: First, we need to create a simple registration page which will contain a form with values like 'name', 'age', 'favourite sport'. Yes, we are considering these 3 values in our registration page. Below is simple code for it.
<form id="personal_details" action="process.php" method="post">
<fieldset>
<legend>Personal Details</legend>
<label for="name">Name</label>
<input type="text" name="name"/>
<label for="age_range">Age</label>
<select name="age_range">
<option value="">Please select an age range</option>
<option value="1">0-12</option>
<option value="2">12-16</option>
<option value="3">16-21</option>
<option value="4">21-30</option>
<option value="5">30-50</option>
<option value="6">50+</option>
</select>
<label for="sports">Please select your favourite sports</label>
<input type="checkbox" name="sports[]" value="soccer" /> Soccer<br />
<input type="checkbox" name="sports[]" value="swimming" /> Swimming<br />
<input type="checkbox" name="sports[]" value="cycling" /> Cycling<br />
<input type="checkbox" name="sports[]" value="kayaking" /> Kayaking<br />
<input type="checkbox" name="sports[]" value="volleyball" /> Volleyball<br />
<input type="checkbox" name="sports[]" value="basketball" /> Basketball<br />
<button type="button" onclick="processDetails();">Submit</button>
<div style="clear:both;"></div>
</fieldset>
</form>
Step 2: Above is a simple html form with all required values. Form action is set to process.php, which will grab the values and save them to MySQL database. We have also declared one function "processDetails()" in our javascript part. all javascripts which are included in this index.php file are below:
forms.js
/*
 * jQuery Form Plugin
 * version: 2.36 (07-NOV-2009)
 * @requires jQuery v1.2.6 or later
 *
 * Examples and documentation at: http://malsup.com/jquery/form/
 * Dual licensed under the MIT and GPL licenses:
 *   http://www.opensource.org/licenses/mit-license.php
 *   http://www.gnu.org/licenses/gpl.html
 */
;(function($) {

/*
 Usage Note:
 -----------
 Do not use both ajaxSubmit and ajaxForm on the same form.  These
 functions are intended to be exclusive.  Use ajaxSubmit if you want
 to bind your own submit handler to the form.  For example,

 $(document).ready(function() {
  $('#myForm').bind('submit', function() {
   $(this).ajaxSubmit({
    target: '#output'
   });
   return false; // <-- important!
  });
 });

 Use ajaxForm when you want the plugin to manage all the event binding
 for you.  For example,

 $(document).ready(function() {
  $('#myForm').ajaxForm({
   target: '#output'
  });
 });

 When using ajaxForm, the ajaxSubmit function will be invoked for you
 at the appropriate time.
*/

/**
 * ajaxSubmit() provides a mechanism for immediately submitting
 * an HTML form using AJAX.
 */
$.fn.ajaxSubmit = function(options) {
 // fast fail if nothing selected (http://dev.jquery.com/ticket/2752)
 if (!this.length) {
  log('ajaxSubmit: skipping submit process - no element selected');
  return this;
 }

 if (typeof options == 'function')
  options = { success: options };

 var url = $.trim(this.attr('action'));
 if (url) {
  // clean url (don't include hash vaue)
  url = (url.match(/^([^#]+)/)||[])[1];
    }
    url = url || window.location.href || '';

 options = $.extend({
  url:  url,
  type: this.attr('method') || 'GET',
  iframeSrc: /^https/i.test(window.location.href || '') ? 'javascript:false' : 'about:blank'
 }, options || {});

 // hook for manipulating the form data before it is extracted;
 // convenient for use with rich editors like tinyMCE or FCKEditor
 var veto = {};
 this.trigger('form-pre-serialize', [this, options, veto]);
 if (veto.veto) {
  log('ajaxSubmit: submit vetoed via form-pre-serialize trigger');
  return this;
 }

 // provide opportunity to alter form data before it is serialized
 if (options.beforeSerialize && options.beforeSerialize(this, options) === false) {
  log('ajaxSubmit: submit aborted via beforeSerialize callback');
  return this;
 }

 var a = this.formToArray(options.semantic);
 if (options.data) {
  options.extraData = options.data;
  for (var n in options.data) {
    if(options.data[n] instanceof Array) {
   for (var k in options.data[n])
     a.push( { name: n, value: options.data[n][k] } );
    }
    else
    a.push( { name: n, value: options.data[n] } );
  }
 }

 // give pre-submit callback an opportunity to abort the submit
 if (options.beforeSubmit && options.beforeSubmit(a, this, options) === false) {
  log('ajaxSubmit: submit aborted via beforeSubmit callback');
  return this;
 }

 // fire vetoable 'validate' event
 this.trigger('form-submit-validate', [a, this, options, veto]);
 if (veto.veto) {
  log('ajaxSubmit: submit vetoed via form-submit-validate trigger');
  return this;
 }

 var q = $.param(a);

 if (options.type.toUpperCase() == 'GET') {
  options.url += (options.url.indexOf('?') >= 0 ? '&' : '?') + q;
  options.data = null;  // data is null for 'get'
 }
 else
  options.data = q; // data is the query string for 'post'

 var $form = this, callbacks = [];
 if (options.resetForm) callbacks.push(function() { $form.resetForm(); });
 if (options.clearForm) callbacks.push(function() { $form.clearForm(); });

 // perform a load on the target only if dataType is not provided
 if (!options.dataType && options.target) {
  var oldSuccess = options.success || function(){};
  callbacks.push(function(data) {
   $(options.target).html(data).each(oldSuccess, arguments);
  });
 }
 else if (options.success)
  callbacks.push(options.success);

 options.success = function(data, status) {
  for (var i=0, max=callbacks.length; i < max; i++)
   callbacks[i].apply(options, [data, status, $form]);
 };

 // are there files to upload?
 var files = $('input:file', this).fieldValue();
 var found = false;
 for (var j=0; j < files.length; j++)
  if (files[j])
   found = true;

 var multipart = false;
// var mp = 'multipart/form-data';
// multipart = ($form.attr('enctype') == mp || $form.attr('encoding') == mp);

 // options.iframe allows user to force iframe mode
 // 06-NOV-09: now defaulting to iframe mode if file input is detected
   if ((files.length && options.iframe !== false) || options.iframe || found || multipart) {
    // hack to fix Safari hang (thanks to Tim Molendijk for this)
    // see:  http://groups.google.com/group/jquery-dev/browse_thread/thread/36395b7ab510dd5d
    if (options.closeKeepAlive)
     $.get(options.closeKeepAlive, fileUpload);
    else
     fileUpload();
    }
   else
    $.ajax(options);

 // fire 'notify' event
 this.trigger('form-submit-notify', [this, options]);
 return this;


 // private function for handling file uploads (hat tip to YAHOO!)
 function fileUpload() {
  var form = $form[0];

  if ($(':input[name=submit]', form).length) {
   alert('Error: Form elements must not be named "submit".');
   return;
  }

  var opts = $.extend({}, $.ajaxSettings, options);
  var s = $.extend(true, {}, $.extend(true, {}, $.ajaxSettings), opts);

  var id = 'jqFormIO' + (new Date().getTime());
  var $io = $('<iframe id="' + id + '" name="' + id + '" src="'+ opts.iframeSrc +'" ></iframe>');
  var io = $io[0];

  $io.css({ position: 'absolute', top: '-1000px', left: '-1000px' });

  var xhr = { // mock object
   aborted: 0,
   responseText: null,
   responseXML: null,
   status: 0,
   statusText: 'n/a',
   getAllResponseHeaders: function() {},
   getResponseHeader: function() {},
   setRequestHeader: function() {},
   abort: function() {
    this.aborted = 1;
    $io.attr('src', opts.iframeSrc); // abort op in progress
   }
  };

  var g = opts.global;
  // trigger ajax global events so that activity/block indicators work like normal
  if (g && ! $.active++) $.event.trigger("ajaxStart");
  if (g) $.event.trigger("ajaxSend", [xhr, opts]);

  if (s.beforeSend && s.beforeSend(xhr, s) === false) {
   s.global && $.active--;
   return;
  }
  if (xhr.aborted)
   return;

  var cbInvoked = 0;
  var timedOut = 0;

  // add submitting element to data if we know it
  var sub = form.clk;
  if (sub) {
   var n = sub.name;
   if (n && !sub.disabled) {
    options.extraData = options.extraData || {};
    options.extraData[n] = sub.value;
    if (sub.type == "image") {
     options.extraData[name+'.x'] = form.clk_x;
     options.extraData[name+'.y'] = form.clk_y;
    }
   }
  }

  // take a breath so that pending repaints get some cpu time before the upload starts
  setTimeout(function() {
   // make sure form attrs are set
   var t = $form.attr('target'), a = $form.attr('action');

   // update form attrs in IE friendly way
   form.setAttribute('target',id);
   if (form.getAttribute('method') != 'POST')
    form.setAttribute('method', 'POST');
   if (form.getAttribute('action') != opts.url)
    form.setAttribute('action', opts.url);

   // ie borks in some cases when setting encoding
   if (! options.skipEncodingOverride) {
    $form.attr({
     encoding: 'multipart/form-data',
     enctype:  'multipart/form-data'
    });
   }

   // support timout
   if (opts.timeout)
    setTimeout(function() { timedOut = true; cb(); }, opts.timeout);

   // add "extra" data to form if provided in options
   var extraInputs = [];
   try {
    if (options.extraData)
     for (var n in options.extraData)
      extraInputs.push(
       $('')
        .appendTo(form)[0]);

    // add iframe to doc and submit the form
    $io.appendTo('body');
    io.attachEvent ? io.attachEvent('onload', cb) : io.addEventListener('load', cb, false);
    form.submit();
   }
   finally {
    // reset attrs and remove "extra" input elements
    form.setAttribute('action',a);
    t ? form.setAttribute('target', t) : $form.removeAttr('target');
    $(extraInputs).remove();
   }
  }, 10);

  var domCheckCount = 50;

  function cb() {
   if (cbInvoked++) return;

   io.detachEvent ? io.detachEvent('onload', cb) : io.removeEventListener('load', cb, false);

   var ok = true;
   try {
    if (timedOut) throw 'timeout';
    // extract the server response from the iframe
    var data, doc;

    doc = io.contentWindow ? io.contentWindow.document : io.contentDocument ? io.contentDocument : io.document;

    var isXml = opts.dataType == 'xml' || doc.XMLDocument || $.isXMLDoc(doc);
    log('isXml='+isXml);
    if (!isXml && (doc.body == null || doc.body.innerHTML == '')) {
      if (--domCheckCount) {
      // in some browsers (Opera) the iframe DOM is not always traversable when
      // the onload callback fires, so we loop a bit to accommodate
      cbInvoked = 0;
      setTimeout(cb, 100);
      return;
     }
     log('Could not access iframe DOM after 50 tries.');
     return;
    }

    xhr.responseText = doc.body ? doc.body.innerHTML : null;
    xhr.responseXML = doc.XMLDocument ? doc.XMLDocument : doc;
    xhr.getResponseHeader = function(header){
     var headers = {'content-type': opts.dataType};
     return headers[header];
    };

    if (opts.dataType == 'json' || opts.dataType == 'script') {
     // see if user embedded response in textarea
     var ta = doc.getElementsByTagName('textarea')[0];
     if (ta)
      xhr.responseText = ta.value;
     else {
      // account for browsers injecting pre around json response
      var pre = doc.getElementsByTagName('pre')[0];
      if (pre)
       xhr.responseText = pre.innerHTML;
     }
    }
    else if (opts.dataType == 'xml' && !xhr.responseXML && xhr.responseText != null) {
     xhr.responseXML = toXml(xhr.responseText);
    }
    data = $.httpData(xhr, opts.dataType);
   }
   catch(e){
    ok = false;
    $.handleError(opts, xhr, 'error', e);
   }

   // ordering of these callbacks/triggers is odd, but that's how $.ajax does it
   if (ok) {
    opts.success(data, 'success');
    if (g) $.event.trigger("ajaxSuccess", [xhr, opts]);
   }
   if (g) $.event.trigger("ajaxComplete", [xhr, opts]);
   if (g && ! --$.active) $.event.trigger("ajaxStop");
   if (opts.complete) opts.complete(xhr, ok ? 'success' : 'error');

   // clean up
   setTimeout(function() {
    $io.remove();
    xhr.responseXML = null;
   }, 100);
  };

  function toXml(s, doc) {
   if (window.ActiveXObject) {
    doc = new ActiveXObject('Microsoft.XMLDOM');
    doc.async = 'false';
    doc.loadXML(s);
   }
   else
    doc = (new DOMParser()).parseFromString(s, 'text/xml');
   return (doc && doc.documentElement && doc.documentElement.tagName != 'parsererror') ? doc : null;
  };
 };
};

/**
 * ajaxForm() provides a mechanism for fully automating form submission.
 *
 * The advantages of using this method instead of ajaxSubmit() are:
 *
 * 1: This method will include coordinates for  elements (if the element
 * is used to submit the form).
 * 2. This method will include the submit element's name/value data (for the element that was
 * used to submit the form).
 * 3. This method binds the submit() method to the form for you.
 *
 * The options argument for ajaxForm works exactly as it does for ajaxSubmit.  ajaxForm merely
 * passes the options argument along after properly binding events for submit elements and
 * the form itself.
 */
$.fn.ajaxForm = function(options) {
 return this.ajaxFormUnbind().bind('submit.form-plugin', function() {
  $(this).ajaxSubmit(options);
  return false;
 }).bind('click.form-plugin', function(e) {
  var target = e.target;
  var $el = $(target);
  if (!($el.is(":submit,input:image"))) {
   // is this a child element of the submit el?  (ex: a span within a button)
   var t = $el.closest(':submit');
   if (t.length == 0)
    return;
   target = t[0];
  }
  var form = this;
  form.clk = target;
  if (target.type == 'image') {
   if (e.offsetX != undefined) {
    form.clk_x = e.offsetX;
    form.clk_y = e.offsetY;
   } else if (typeof $.fn.offset == 'function') { // try to use dimensions plugin
    var offset = $el.offset();
    form.clk_x = e.pageX - offset.left;
    form.clk_y = e.pageY - offset.top;
   } else {
    form.clk_x = e.pageX - target.offsetLeft;
    form.clk_y = e.pageY - target.offsetTop;
   }
  }
  // clear form vars
  setTimeout(function() { form.clk = form.clk_x = form.clk_y = null; }, 100);
 });
};

// ajaxFormUnbind unbinds the event handlers that were bound by ajaxForm
$.fn.ajaxFormUnbind = function() {
 return this.unbind('submit.form-plugin click.form-plugin');
};

/**
 * formToArray() gathers form element data into an array of objects that can
 * be passed to any of the following ajax functions: $.get, $.post, or load.
 * Each object in the array has both a 'name' and 'value' property.  An example of
 * an array for a simple login form might be:
 *
 * [ { name: 'username', value: 'jresig' }, { name: 'password', value: 'secret' } ]
 *
 * It is this array that is passed to pre-submit callback functions provided to the
 * ajaxSubmit() and ajaxForm() methods.
 */
$.fn.formToArray = function(semantic) {
 var a = [];
 if (this.length == 0) return a;

 var form = this[0];
 var els = semantic ? form.getElementsByTagName('*') : form.elements;
 if (!els) return a;
 for(var i=0, max=els.length; i < max; i++) {
  var el = els[i];
  var n = el.name;
  if (!n) continue;

  if (semantic && form.clk && el.type == "image") {
   // handle image inputs on the fly when semantic == true
   if(!el.disabled && form.clk == el) {
    a.push({name: n, value: $(el).val()});
    a.push({name: n+'.x', value: form.clk_x}, {name: n+'.y', value: form.clk_y});
   }
   continue;
  }

  var v = $.fieldValue(el, true);
  if (v && v.constructor == Array) {
   for(var j=0, jmax=v.length; j < jmax; j++)
    a.push({name: n, value: v[j]});
  }
  else if (v !== null && typeof v != 'undefined')
   a.push({name: n, value: v});
 }

 if (!semantic && form.clk) {
  // input type=='image' are not found in elements array! handle it here
  var $input = $(form.clk), input = $input[0], n = input.name;
  if (n && !input.disabled && input.type == 'image') {
   a.push({name: n, value: $input.val()});
   a.push({name: n+'.x', value: form.clk_x}, {name: n+'.y', value: form.clk_y});
  }
 }
 return a;
};

/**
 * Serializes form data into a 'submittable' string. This method will return a string
 * in the format: name1=value1&name2=value2
 */
$.fn.formSerialize = function(semantic) {
 //hand off to jQuery.param for proper encoding
 return $.param(this.formToArray(semantic));
};

/**
 * Serializes all field elements in the jQuery object into a query string.
 * This method will return a string in the format: name1=value1&name2=value2
 */
$.fn.fieldSerialize = function(successful) {
 var a = [];
 this.each(function() {
  var n = this.name;
  if (!n) return;
  var v = $.fieldValue(this, successful);
  if (v && v.constructor == Array) {
   for (var i=0,max=v.length; i < max; i++)
    a.push({name: n, value: v[i]});
  }
  else if (v !== null && typeof v != 'undefined')
   a.push({name: this.name, value: v});
 });
 //hand off to jQuery.param for proper encoding
 return $.param(a);
};

/**
 * Returns the value(s) of the element in the matched set.  For example, consider the following form:
 *
 *  <form><fieldset>
 *   <input name="A" type="text" />
 *   <input name="A" type="text" />
 *   <input name="B" type="checkbox" value="B1" />
 *   <input name="B" type="checkbox" value="B2"/>
 *   <input name="C" type="radio" value="C1" />
 *   <input name="C" type="radio" value="C2" />
 *  </fieldset></form>
 *
 *  var v = $(':text').fieldValue();
 *  // if no values are entered into the text inputs
 *  v == ['','']
 *  // if values entered into the text inputs are 'foo' and 'bar'
 *  v == ['foo','bar']
 *
 *  var v = $(':checkbox').fieldValue();
 *  // if neither checkbox is checked
 *  v === undefined
 *  // if both checkboxes are checked
 *  v == ['B1', 'B2']
 *
 *  var v = $(':radio').fieldValue();
 *  // if neither radio is checked
 *  v === undefined
 *  // if first radio is checked
 *  v == ['C1']
 *
 * The successful argument controls whether or not the field element must be 'successful'
 * (per http://www.w3.org/TR/html4/interact/forms.html#successful-controls).
 * The default value of the successful argument is true.  If this value is false the value(s)
 * for each element is returned.
 *
 * Note: This method *always* returns an array.  If no valid value can be determined the
 *    array will be empty, otherwise it will contain one or more values.
 */
$.fn.fieldValue = function(successful) {
 for (var val=[], i=0, max=this.length; i < max; i++) {
  var el = this[i];
  var v = $.fieldValue(el, successful);
  if (v === null || typeof v == 'undefined' || (v.constructor == Array && !v.length))
   continue;
  v.constructor == Array ? $.merge(val, v) : val.push(v);
 }
 return val;
};

/**
 * Returns the value of the field element.
 */
$.fieldValue = function(el, successful) {
 var n = el.name, t = el.type, tag = el.tagName.toLowerCase();
 if (typeof successful == 'undefined') successful = true;

 if (successful && (!n || el.disabled || t == 'reset' || t == 'button' ||
  (t == 'checkbox' || t == 'radio') && !el.checked ||
  (t == 'submit' || t == 'image') && el.form && el.form.clk != el ||
  tag == 'select' && el.selectedIndex == -1))
   return null;

 if (tag == 'select') {
  var index = el.selectedIndex;
  if (index < 0) return null;
  var a = [], ops = el.options;
  var one = (t == 'select-one');
  var max = (one ? index+1 : ops.length);
  for(var i=(one ? index : 0); i < max; i++) {
   var op = ops[i];
   if (op.selected) {
    var v = op.value;
    if (!v) // extra pain for IE...
     v = (op.attributes && op.attributes['value'] && !(op.attributes['value'].specified)) ? op.text : op.value;
    if (one) return v;
    a.push(v);
   }
  }
  return a;
 }
 return el.value;
};

/**
 * Clears the form data.  Takes the following actions on the form's input fields:
 *  - input text fields will have their 'value' property set to the empty string
 *  - select elements will have their 'selectedIndex' property set to -1
 *  - checkbox and radio inputs will have their 'checked' property set to false
 *  - inputs of type submit, button, reset, and hidden will *not* be effected
 *  - button elements will *not* be effected
 */
$.fn.clearForm = function() {
 return this.each(function() {
  $('input,select,textarea', this).clearFields();
 });
};

/**
 * Clears the selected form elements.
 */
$.fn.clearFields = $.fn.clearInputs = function() {
 return this.each(function() {
  var t = this.type, tag = this.tagName.toLowerCase();
  if (t == 'text' || t == 'password' || tag == 'textarea')
   this.value = '';
  else if (t == 'checkbox' || t == 'radio')
   this.checked = false;
  else if (tag == 'select')
   this.selectedIndex = -1;
 });
};

/**
 * Resets the form data.  Causes all form elements to be reset to their original value.
 */
$.fn.resetForm = function() {
 return this.each(function() {
  // guard against an input with the name of 'reset'
  // note that IE reports the reset function as an 'object'
  if (typeof this.reset == 'function' || (typeof this.reset == 'object' && !this.reset.nodeType))
   this.reset();
 });
};

/**
 * Enables or disables any matching elements.
 */
$.fn.enable = function(b) {
 if (b == undefined) b = true;
 return this.each(function() {
  this.disabled = !b;
 });
};

/**
 * Checks/unchecks any matching checkboxes or radio buttons and
 * selects/deselects and matching option elements.
 */
$.fn.selected = function(select) {
 if (select == undefined) select = true;
 return this.each(function() {
  var t = this.type;
  if (t == 'checkbox' || t == 'radio')
   this.checked = select;
  else if (this.tagName.toLowerCase() == 'option') {
   var $sel = $(this).parent('select');
   if (select && $sel[0] && $sel[0].type == 'select-one') {
    // deselect all other options
    $sel.find('option').selected(false);
   }
   this.selected = select;
  }
 });
};

// helper fn for console logging
// set $.fn.ajaxSubmit.debug to true to enable debug logging
function log() {
 if ($.fn.ajaxSubmit.debug && window.console && window.console.log)
  window.console.log('[jquery.form] ' + Array.prototype.join.call(arguments,''));
};

})(jQuery);
save.js
$("document").ready(function() {
 $("#personal_details").submit(function() {
  processDetails();
  return false;
 });
});

function processDetails() {
 var errors = '';

 // Validate name
 var name = $("#personal_details [name='name']").val();
 if (!name) {
  errors += ' - Please enter a name\n';
 }
 // Validate age range
 var age_range = $("#personal_details [name='age_range']").val();
 if (!age_range) {
  errors += ' - Please select and age range\n';
 }
 // Validate sports selection
 var sports = $("#personal_details [name='sports[]']:checked").length;
 if (!sports) {
  errors += ' - Please select your favourite sports\n';
 }

 if (errors) {
  errors = 'The following errors occurred:\n' + errors;
  alert(errors);
  return false;
 } else {
  // Submit our form via Ajax and then reset the form
  $("#personal_details").ajaxSubmit({success:showResult});
  return false;
 }

}

function showResult(data) {
 if (data == 'save_failed') {
  alert('Form save failed, please contact your administrator');
  return false;
 } else {
  $("#personal_details").clearForm().clearFields().resetForm();
  alert('Form save success');
  return false;
 }
}
Step 3: Simply copy and paste above two JavaScript in two different .js files and call them in index.php followed by following JavaScript which will be called on-line directly from Google code.
<script type="text/javascript">
 google.load("jquery", "1.4");
</script>
Step 4: Now, all you need to do is to write code in your process.php file. In this file, first a connection will be made to database and then by getting values by using POST method, they will be saved into MySQL database.
process.php
<?php
// Retrieve form data
$name = $_POST['name'];
$age_range = $_POST['age_range'];
$sports = $_POST['sports'];
if (!$name || !$age_range || !$sports) {
 echo "save_failed";
 return;
}
// Convert sports array to a serialized string
$sports_list = serialize($sports);

$db = array(
 'host' => 'localhost',
 'login' => 'username_here',
 'password' => 'password_here',
 'database' => 'write_database_name_here',
);
$link = @mysql_connect($db['host'], $db['login'], $db['password']);
if (!$link) {
 echo "save_failed";
 return;
}
mysql_select_db($db['database']);

// Clean variables before performing insert
$clean_name = mysql_real_escape_string($name);
$clean_age_range = mysql_real_escape_string($age_range);
$clean_sports_list = mysql_real_escape_string($sports_list);
// Perform insert
$sql = "INSERT INTO details (name, age_range_ID, sports) VALUES ('{$clean_name}', {$clean_age_range}, '{$clean_sports_list}')";
if (@mysql_query($sql, $link)) {
 echo "success";
 @mysql_close($link);
 return;
} else {
 echo "save_failed";
 @mysql_close($link);
 return;
}
?>
That's it! Now you are ready to run this whole script in your web server. Make sure that you have given correct values for database connection, i.e., host name, username, password and database values. Enjoy!
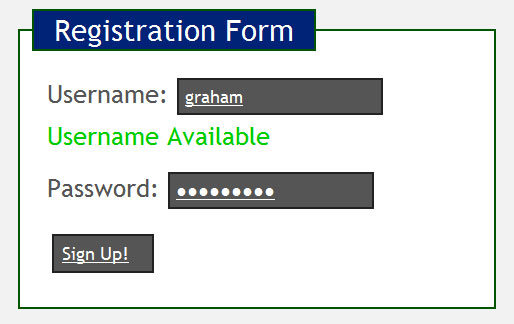
While working on any php script which includes validation measures, the reliability and usability of the software becomes the priority for developer. It can be achieved through various aspects such as by keeping simple design and giving as much required feedback to user as much possible. In this article, we will see one minor section of such usability features which can be used in registration form to make program more user-friendly. It is about instant username checking or validating as soon as user type in the username. For this, we also need jQuery which will execute the query each time we enter a character in the username field. Overall, script is very much easy to use and implement in any type of website with any design.
Steps to create a username validation script in PHP:
Step 1: In this very first step, we will create a database with the name "databaseCheck" in MySQL. Of course, for simplicity, you can prefer phpmyadmin for it. You can install WampServer for phpmyadmin.
Step 2: For this example purpose, we are keeping only one field in the database which is named "username". Thats it. You can add 3-4 user names in it. Let us add 'Mekey', 'Salaria', 'user', 'admin'.
Step 3: Now, as you are ready with your database, its time to write some PHP code. We will go step by step for each single file.
Step 4: Create a PHP with name "index.php" and add the following code in it. I have also written description of code in the form of comments within the code given below to make it more clear to you.
<html>
<head>
<title>Instant Username Validation script by MyNameIs</title>
</head>
<script src="http://ajax.googleapis.com/ajax/libs/jquery/1.3.2/jquery.js" type="text/javascript">
</script>
<?php
/*This part of script is very important. It will check for the username in the database, if the username
is found in database then it will show an error image if not, then user available tick mark will be shown. Javascript
calls check.php in order to check the username value.
Also, some CSS part is embedded within the javascript below but its only for designing purpose which has nothing to do with
functioning of script
*/
?>
<script>
$(document).ready(function(){
$('#username').keyup(username_check);
});
function username_check(){
var username = $('#username').val();
if(username == "" || username.length < 4){
$('#username').css('border', '3px #CCC solid');
$('#tick').hide();
}else{
jQuery.ajax({
   type: "POST",
   url: "check.php",
   data: 'username='+ username,
   cache: false,
   success: function(response){
if(response == 1){
 $('#username').css('border', '3px #C33 solid');
 $('#tick').hide();
 $('#cross').fadeIn();
 }else{
 $('#username').css('border', '3px #090 solid');
 $('#cross').hide();
 $('#tick').fadeIn();
      }
}
});
}
}
</script>
<style>
#username{
 padding:3px;
 font-size:18px;
 border:3px #CCC solid;
}
#tick{display:none}
#cross{display:none}
</style>
</head>
<body>
Here are some usernames that have been put in the database:<br/><br/>
Mekey, Salaria, user, admin<br/><br/>
Username: <input name="username" id="username" type="text" />
<img id="tick" src="tick.png" width="16" height="16"/>
<img id="cross" src="cross.png" width="16" height="16"/>
</body>
</html>
Step 5: After completely understanding index.php you are ready for the next part. You can see in above script that JavaScript has called another PHP file named "check.php" with the method POST. So, it send all of the grabbed information, i.e., username, to the check.php, where it validates the information. This check.php is connected to the database using another file called "dbConnector.php".
Here is the code to use in this file:
<?php
class DbConnector {
var $theQuery;
var $link;
function DbConnector(){
        // Get the main settings from the array we just loaded
        $host = 'HOST'; //it use to be localhost in most of cases
        $db = 'DATABASE'; //set the name of database in which you have created table userCheck
        $user = 'USERNAME'; //here you need to write username, by default it is root
        $pass = 'PASSWORD';//keep it blank if you have not given any password for your database else type your password here
        // Connect to the database
        $this->link = mysql_connect($host, $user, $pass);
        mysql_select_db($db);
        register_shutdown_function(array(&$this, 'close'));
    }
  //*** Function: query, Purpose: Execute a database query ***
    function query($query) {
        $this->theQuery = $query;
        return mysql_query($query, $this->link);
    }
    //*** Function: fetchArray, Purpose: Get array of query results ***
    function fetchArray($result) {
       return mysql_fetch_array($result);
    }
    //*** Function: close, Purpose: Close the connection ***
    function close() {
        mysql_close($this->link);
    }
}
?>
Step 6: Now, last step of code is to write your check.php file. It will search through all used usernames and give back the desired result.
<?php
//Followinh line will include dbConnector.php file to make connection with the database
include("dbConnector.php");
$connector = new DbConnector();
$username = trim(strtolower($_POST['username']));
$username = mysql_escape_string($username);
//below is the sql query to select username values from database
$query = "SELECT username FROM usernameCheck WHERE username = '$username' LIMIT 1";
$result = $connector->query($query);
$num = mysql_num_rows($result);
echo $num;
mysql_close();
?>
Step 7: The code above look for the username which is typed in username field in the database, if its found, then $num would be >= 1. It means that username already exist in database hence error indication will be displayed.
In this way, you can easily set up this validation measure in any of your registration form. Thank You!
Subscribe to:
Posts (Atom)


