
Recent Articles
Monday, September 3, 2012
Monday, September 3, 2012
- 0 Comments

This is Simple and cheap approach to Line Following Robot, This do not have any micro controller but just a simple basic Circuit on three 555 timers. It has a good efficiency on following all kind of curves. This Robot is no more than 1000PKR. To make a reliable and well functioning robot, you just not need Electronics Skills but also a little Mechanical too. Having a Electronics mind, the most difficult job I felt in making this robot was Tires which would fit Properly in my motors and the Structure of Robot. For these stuff I accessed my University’s Lathe Machine for tires and a Wood Work shop to make the Structure.
| Parts List | |
|
Circuit Diagram:

Does this circuit looks difficult to you ?! wana go for a simpler than this ?! Click here to see my Differential Drive based Line following Robot made on just BC108 Transistors.This is complete Diagram of whole circuit for Line Following Robot, but I have not shown the connections for LEDs, So for that, you will have to connect two LEDs in series of 1k resistor with +ve and -ve of this circuit.
Bread Board Arrangement:

Dont feel that this is any difficult circuit, its very simple if you notice that Both 555 Timer circuits(others except center one) are exactly same. So you actually need to built the following two circuits.
Our motors are not directly connected to the outputs of 555 Timer, but a transistor is used as a switch. The Pin Configuration of this transistor is (1)Emitter, (2)Base & (3)Collector

I name this Part of the Circuit as Motor Driver Circuit, Now this is a circuit in which our DC geared motors are to be Hooked up, So wee need to make two circuits like this one in which The pin no 2 (Trigger) is given input from the Center 555 Timer Circuit In the above images
It is configured as monostable, that means when they are triggered they give a pulse on the ouput pin which is then connected to transistor as switch circuit for motors

Now this is the Circuit which gives Output to the twin circuits (Motor Driver Circuits)
This is configured as an Astable Square wave generating a trigger pulse with a frequency of 1kHz
Where the width of the Square wave is determined by the 4.7K resisotor and 10mF capcaitor in this circuit

Sensor part: This is the most important part of the LFR, because it has the sensor which guides the robot to move on Line and donot leave the track EveR ! These LDRS are the eyes of the LFR.
As you can see i have kept long wires which i have later connected to circuit, the reason for taking long wires is to be free of placing this strip sensor board anywhere suitable to structure and for perfection.
The LEDs in this part, are all the time ON. The reflection of LEDs is sensed by LDRs. When LEDs are on black area there is no reflection and LDRs are dark (Motors Run) but when LEDs see white line the LDRs are shone some light and hence trigger the Motors to turn off
In my Structure as you see in Video, My sensor part is not fixed. When you design your chasis of Robot, must have any technique to fit the sensor part Fixed in the structure. Make sure to keep sensor part height to be as lowest as possible for higher efficiency
Movement Principle of LFR:
Must Use DC geared Motors for this Circuit, Because ordinarary motors do not have enough torque to carry the weight of the structure

Friday, July 20, 2012
Friday, July 20, 2012
- 2 Comments
Step 1: We need to connect to database first. For this purpose, making a separate file with connection settings would be a better idea, as we can call it on any page whenever we need it. So, the file which we will make is here:
--------------------------X-----------------------
<?php
$host = 'localhost'; // MYSQL database host adress
$db = 'test'; // MYSQL database name
$user = 'root'; // Mysql Datbase user
$pass = ''; // Mysql Datbase password
// Connect to the database
$link = mysql_connect($host, $user, $pass);
mysql_select_db($db);
require 'exportcsv.inc.php';
$table="users"; // this is the tablename that you want to export to csv from mysql.
exportMysqlToCsv($table);
?>
--------------------------X-----------------------
Step 2: Save this file as index.php
Step 3: Now if you have observed carefully, you will find that, line "require 'exportcsv.inc.php' is calling another PHP file. This file contains a function called "exportMysqlToCsv()" which when called, return the CSV/Excel file.
Step 4: Let's create it. Copy the code from below and paste it in you notepad:
--------------------------X-----------------------
<?php
function exportMysqlToCsv($table,$filename = 'export.csv')
{
$csv_terminated = "\n";
$csv_separator = ",";
$csv_enclosed = '"';
$csv_escaped = "\\";
$sql_query = "select * from $table";
// Gets the data from the database
$result = mysql_query($sql_query);
$fields_cnt = mysql_num_fields($result);
$schema_insert = '';
for ($i = 0; $i < $fields_cnt; $i++) { $l = $csv_enclosed . str_replace($csv_enclosed, $csv_escaped . $csv_enclosed, stripslashes(mysql_field_name($result, $i))) . $csv_enclosed; $schema_insert .= $l; $schema_insert .= $csv_separator; } // end for $out = trim(substr($schema_insert, 0, -1)); $out .= $csv_terminated; // Format the data while ($row = mysql_fetch_array($result)) { $schema_insert = ''; for ($j = 0; $j < $fields_cnt; $j++) { if ($row[$j] == '0' || $row[$j] != '') { if ($csv_enclosed == '') { $schema_insert .= $row[$j]; } else { $schema_insert .= $csv_enclosed . str_replace($csv_enclosed, $csv_escaped . $csv_enclosed, $row[$j]) . $csv_enclosed; } } else { $schema_insert .= ''; } if ($j < $fields_cnt - 1) { $schema_insert .= $csv_separator; } } // end for $out .= $schema_insert; $out .= $csv_terminated; } // end while header("Cache-Control: must-revalidate, post-check=0, pre-check=0"); header("Content-Length: " . strlen($out)); // Output to browser with appropriate mime type, you choose ;) header("Content-type: text/x-csv"); //header("Content-type: text/csv"); //header("Content-type: application/csv"); header("Content-Disposition: attachment; filename=$filename"); echo $out; exit; } ?>
--------------------------X-----------------------
Step 5: Save above code in file named anything like m2c.php.
In above file, following code will downlaod all data of $table table into CSV file.
$sql_query = "select * from $table";
Step 6: If you want only a part of database or only required values to be downloaded in CSV file format, you can alter this line to somewhat like the one given below:
$sql_query = "select * from $table WHERE id='23'";
Like this you can export and download your mysql data in any form in seconds. Hope this would help you.
Tuesday, July 17, 2012
Tuesday, July 17, 2012
- 0 Comments

When apple released the iphone 4S last year it came out with a new virtual assistant called siri. alot of people thought that eventually apple would release a version of siri for the older devices but they didnt. so today i am going to show you how to get siri on almost every device (ipad 1, ipad 2, ipad 3, iphone 4, ipod touch 4, iphone 3gs,iphone 3g,ipod 2g.
Ok, lets get started with this tutorial.. First you will need a jailbrocken idevice in order to procede, if you dont know how to jailbreak i will show you how to on another post.
Step 1: Open up cydia and let it load.

Step 2: Once it has loaded go to manage sources edit and add.

Step 3: Then you add this source http://repo.siriport.ru/
Step 4: Once you have added the source you have to click on it, and then install siri port original.
.PNG)
Step 5: Once you have finished that your device will respring.
Step 6: You go to settings and scroll to the bottom and click where it says siriport.ru original.
.PNG)
Step 7: Once you have clicked that you need press install certificate.
.PNG)
Step 8: It will ask you to install the profile and it will say not trusted but don't worry it is.
.PNG)
Step 9: Now you have to reboot your device.
Step 10: Go to settings general siri and enter in your prefered information.
.PNG)
Now you have succesfully installed siri on your device but if it gives you an error this is what you have to do:
open up cydia and install ifile. Then open up ifile and go to library then preferences and delete every thing in the folder.
You click on the edit button which is on the top right of the screen select everything and move to trash. After you have done this click on the trash icon again and click on empty trash.
Now siri should work on your device!
Saturday, July 14, 2012
Saturday, July 14, 2012
- 0 Comments

Recently, I was working on a project where I had to develop a UI for SOLR search engine. I was proposed to use either VelocityRespondWriter or XSLT. Well, I was new to it, and let you know that before starting on this project, I had never heard about SOLR. As per my habbit, I never say 'NO', so, as usual, I made a deal and started on it. I kept researching, exploring references blah blah. Finally, with very first success, I got to know, yeah! VelocityRespondWriter would be easier, compared to XSLT. reason is HTML/CSS programming, in which I do most of my project works and I'm expertise in. Well, very first step was completed.
Now, it was time to sit and get to know what exactly this VelocityRespondWriter is? Even now, I don't know much about it in deep, but one thing is got to know is how to work with it to customize your UI. So, let's begin to this very simple but awesome tour of SOLR's UI customization ;)
Step 1: Well, get ready with everything setup. I assume that you know basics of Apache SOLR (Apache Lucene). You must have it installed on you computer.
Step 2: Launch your SOLR Search Engine by going to command prompt. Move to C:\solr\examples in your command terminal and execute this command:
java -jar start.jar
Step 3: Well, you must see something like this:
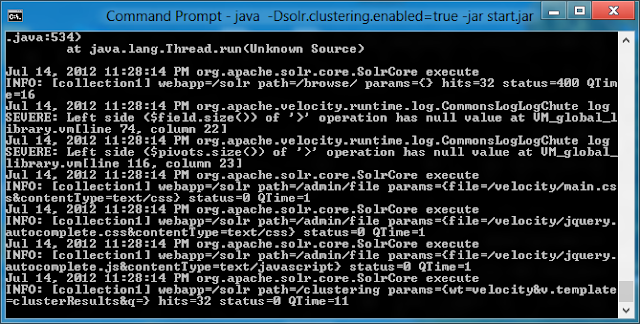
Step 4: If you can see exact screen as shown above in your computer, your first job is done! To open SORL Search page. navigate to following URL in your favorite web browser:
http://localhost:8983/solr/collection1/browse/?
Step 5: Now, it's time to work with VelocityRespongWriter to edit your UI. The default UI which SOLR provides is something like shown below:

Step 6: Cool, so, its time to customize this boring user interface and get one of your choice. So, let you know what all you need to do.
Step 7: Go to the following path:
C:\solr\example\solr\conf\velocity
Step 8: In the velocity directory, you will see number of files with the extension ".vm" along with few CSS (Stylesheet) files.
Step 9: Open header.vm file in your favorite text editor. I recommend you to use notepad++. It has text something like this:

Step 10: if you want to change the default SOLR logo, simply edit the <img src....> code, and refresh your Search page in browser. Viola!!! ;)
Step 11: Similarly, open all other .VM files one by one and play with HTML code with CSS tricks. You will see your own customized UI in a very little time. Well, I would like to show you just a part of UI I had customized, especially, header part:

Step 12: To use images on your .VM files, you must store them under following directory:
C:\solr\example\work\jetty-0.0.0.0-8983-solr.war-_solr-any-\webapp\img
Well, its all for now, I will continue working on this powerful search engine and hope to see you again on the same spot with another new interesting piece of information. Goodbye for now!

MILLIONS of people around the world suffering from nerve related diseases like multiple sclerosis , parkinsons, muscular dystrophy , spinal cord injuries and amputees will benefit enormously by the revolutionary discovery that will enable them to interact with the world through the use of computers which are equipped with a special device. Everybody deserves to have the experience of interacting with an amazing device which we call the computer.
This device enables one to control the computer with a simple eye movement.
In effect the eye movement replaces the function of the mouse. It is also able to ascertain where a person is looking by tracking the eye movements. The device can also be used to control an electronic wheelchair or a robotic prosthetic limb.
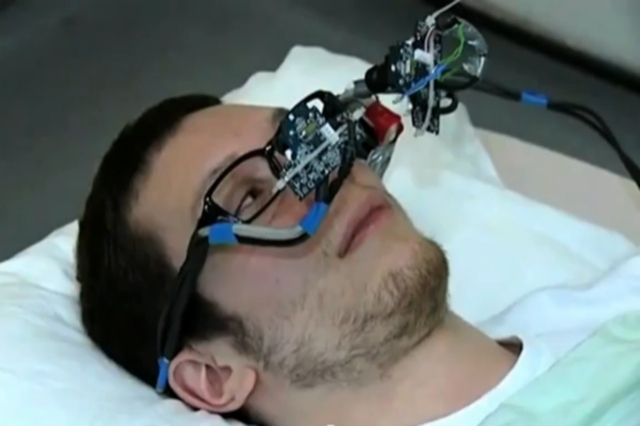
This is an amazing device because it has a 3D eye tracking system which is at least a hundred times cheaper and a real time brain machine which allows patients to communicate easily and quickly
Extensive research has been done in the bio engineering dept of Imperial College, London, by getting a group of people to play the computer game pogo without any kind of handset. They also demonstrated that it is possible to use email and browse the web with the same technique.
The commercially viable device which consists of two video game console cameras attached to an eye piece, uses approx 1 watt of power and can transmit data wirelessly over WIFI into any windows or linux computer. The two video game console cameras and eye piece cost approx 40.00 pounds.This is a great price considering its features
This revolutionary device will allow patients to achieve independence in spite of their health issues and make their lives so much more meaningful in every way.
Friday, July 13, 2012
Friday, July 13, 2012
- 0 Comments
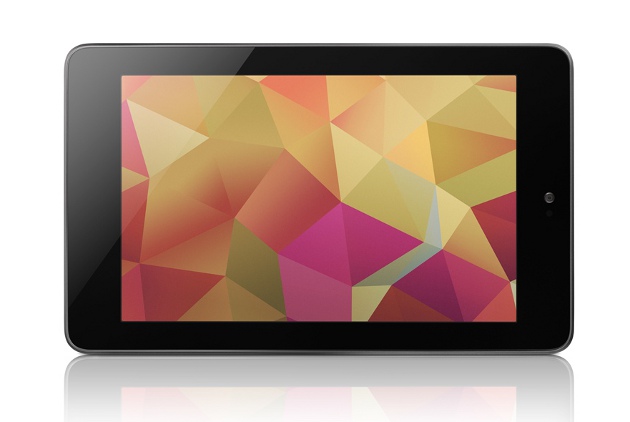
The nexus is a tablet that is to be released in July.
The name nexus comes from the movie Blade Runner. So basically what Google is saying is that the nexus is the ultimate android which will destroy all other androids
It has been said that the nexus 7 has been created to be most harmful to the kindle fire because when they became a relatively good competitor to the ipad, Google didn’t benefit from their success. Google made the amazing operating system which is known as android which is open to any manufacturer who wants to use it but Amazon took the android OS and modified it severely.
They took out the services that Google did and the advertisement and replaced them with amazons own apps. This is not a decent thing to do.
I feel the nexus will succeed because of its value for money, its only $199.
Some features in the nexus are:
1) 7 inch screen like the nook fire
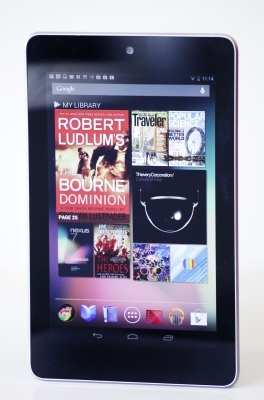
2) Front camera (a feature which the kindle fire doesn’t have. this means the nexus will have video conferencing.

3) It has a microphone. (This is something that the kindle fire doesn’t have. this makes the kindle absolutely worthless because there is absolutely no communication options.)
4) Has a great high resolution screen which makes the whole experience much better
5) Don’t forget its much thinner and lighter than the kindle.

6) OMG it’s the first device to run googles latest version of android (Jelly Bean)
7) Google even gives you a $25 to spend on the new Google app store.
8) The best part is that it has Bluetooth, GPS and navigation software
But hang on there are a few downfalls in this tablet
1) As this is the latest version of android all the apps might not work
2) There is only 8GB of memory which means you cannot download several movies, without filling up your memory but there is a solution for this. You can get the 16GB model which is $249
This tablet is absolutely perfect for its price.
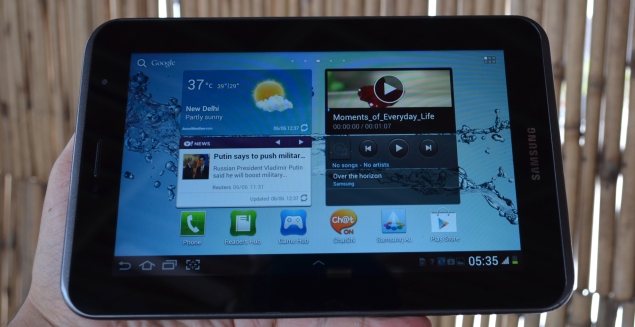
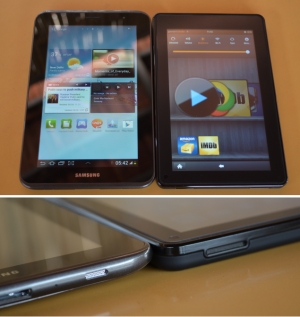
Samsung is a very strategical company because in India they are only releasing the 7 inch galaxy tab where as in Korea they have almost all the sizes for their customers. This shows that they are evaluating sales and then selling different sized screens in different countries according to the sales.
Samsung launched the Galaxy Tab 2 310 which is the first tablet to run ice cream sandwich in India.
this is a huge changing point when it comes to how Samsung targets its market because instead of going after the other companies buyers like the ipad, this time they realized that that they would go after the buyers who don’t have a budget.
Hardware aspects of Galaxy Tab 2 310
So basically the galaxy tap is very similar to its previous version except:
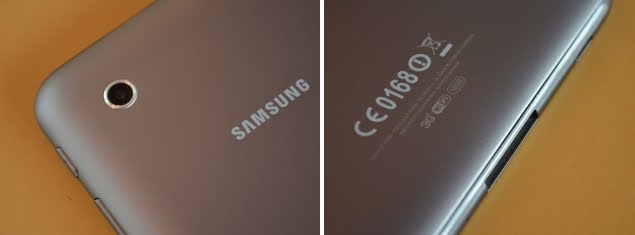
1) The back of the tab is made out of a certain plastic called matte plastic which is fingerprint resistance but the screen still not finger print proof.
2) It has a memory card slot. (Micro SD slot).
3) Comes with a sim card slot which is badly designed and takes along time to insert a sim in
4) Doesn’t have a micro USB portion
5) On the top of the device there is a 3.5mm audio jack and on the bottom of the device the charging port is connected to the speakers.
6) Has a disappointing 3mp primary camera and a vga front camera. The quality of images will be mediocre.
7) Dual core processor 1ghz
8) 1 GB ram which is a good amount for a tablet
Software on the Galaxy Tab 2 310
It took Samsung along time to bring android 4.0 (ice cream sandwich) to India. But it has finally arrived.
Here are some advantages in ice cream sandwich!!
1) It is a present operating to use
2) You can install chrome
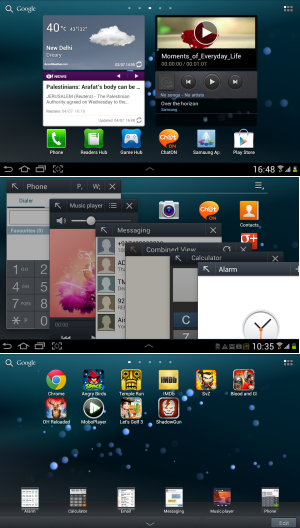
3) Pre installed app front. This is like a bunch of mini apps e.g. calculator, alarm, music player, office and photo editor. They are apps that don’t take up a whole screen. This is a useful feature.
Great and new features are:
1) 3G connectivity
2) Voice calling support which works perfectly allowing you to make calls and receive texts
3) Game playback works fine
Battery performance
The battery will last for 2 days with normal use but if you use 3G and heavy use it want even last a day
So basically the greatest downfall in this device is the camera and the wifi range. Other wise the tablet is above average because they are selling it at a decent price compared to the previous tablet.
Subscribe to:
Comments (Atom)


